Mastering the Art of Selecting Ingredients for Praline
Tips for Choosing Premium Quality Nuts for Praline
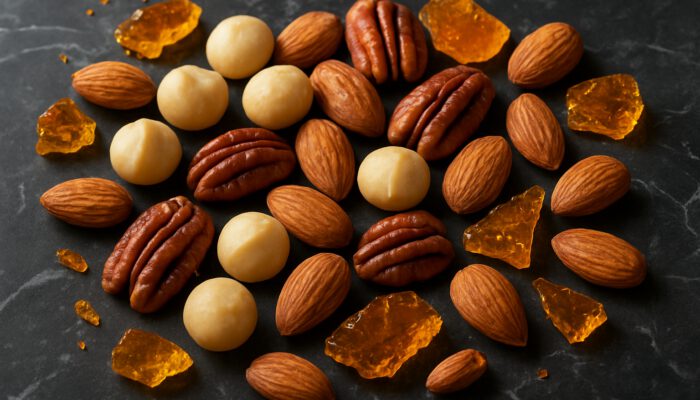
Selecting the finest nuts is a critical step in the process of creating homemade praline. Choices like pecans, hazelnuts, and almonds not only add a delightful crunch but also impart a rich flavor that pairs beautifully with caramelized sugar. When choosing your nuts, always prioritize fresh, high-quality varieties, preferably raw or lightly roasted to retain their natural oils and flavors.
The type of nuts you select will significantly affect the texture and taste of your praline. For instance, pecans deliver a buttery richness, while almonds offer a subtle nuttiness. Consider the origin of your nuts as well; for example, Australian macadamias can lend a unique twist to your praline, enriching its overall profile.
Always examine your nuts for signs of rancidity or moisture, as freshness is paramount for achieving that perfect crunch and flavor balance in your praline. By investing in high-quality nuts, you set the foundation for a standout praline that will impress everyone who tastes it.
What Are the Best Sugar Options for Enhancing Praline Flavor?
The choice of sugar is a pivotal factor in determining the overall success and flavor profile of your praline. While granulated white sugar is the most commonly used option due to its ability to caramelize beautifully, alternatives such as brown sugar or coconut sugar can bring unique flavor dimensions to your creation.
For example, brown sugar contains molasses, which enriches your praline with a deeper, more complex taste. On the other hand, coconut sugar, known for its lower glycemic index, adds a subtle caramel flavor that is particularly appealing to health-conscious cooks. Exploring and experimenting with a variety of sugars can lead to exciting and delicious variations in your praline recipe.
Regardless of the sugar type you select, ensure that it is free from clumps and impurities. A clean sugar will facilitate a smooth caramelization process, bestowing your praline with the perfect glossy finish and satisfying crunch that everyone loves.
Essential Measuring Tools for Accurate Praline Preparation
Accurate measurements are vital when it comes to making praline, as precision ensures consistent results. A digital kitchen scale is an indispensable tool, allowing you to weigh your ingredients with accuracy, which is crucial for achieving the desired texture and flavor. Measuring cups and spoons are also beneficial, particularly for liquid ingredients like water or cream.
Utilizing a candy thermometer can greatly enhance your praline-making experience. This tool ensures that the sugar reaches the correct temperature necessary for caramelization, a critical aspect for obtaining that perfect texture. Avoid relying solely on visual cues since sugar can transition quickly from perfectly caramelized to burnt if not monitored closely.
Investing in high-quality measuring tools is a long-term gain. They help you avoid common pitfalls that can lead to disappointing results, ensuring that your homemade pralines are delectable and consistently enjoyable every time you make them.
Finding Top-Quality Additional Ingredients to Elevate Your Praline
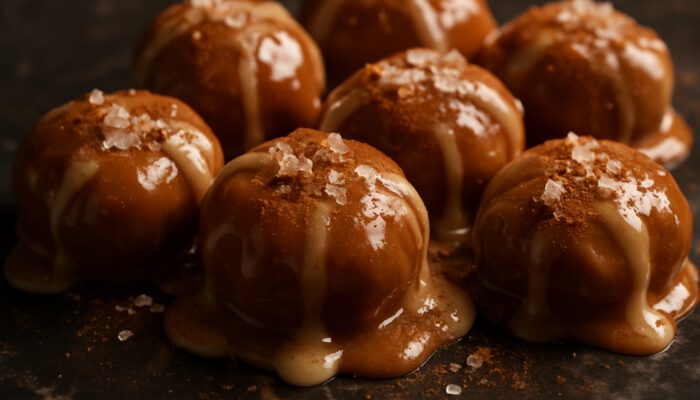
Incorporating high-quality extra ingredients can transform your homemade praline from simply good to truly exceptional. Ingredients such as pure vanilla extract, sea salt, or spices like cinnamon can significantly enhance the overall flavor profile. A splash of vanilla adds warmth, while sea salt creates a delightful contrast to the sweetness of the caramel.
When sourcing these additional ingredients, always opt for pure extracts rather than synthetic alternatives. The difference in flavor will be striking and will elevate the quality of your praline. For salt, consider using flaky sea salt, which provides a satisfying crunch and bursts of flavor that elevate your sweet creation.
Feel free to experiment with other flavorings too. Elements like orange zest or espresso powder can introduce unique variations that will impress your friends and family, making your praline a standout treat for any occasion.
Comprehensive Step-by-Step Guide for Crafting Praline at Home
What Flavor Pairings Work Best with Praline?
Mastering the art of flavor pairings can dramatically elevate the appeal of your praline. Consider combining nuts with complementary flavors such as dark chocolate, sea salt, or spices like cinnamon and nutmeg. These combinations can create unforgettable taste experiences that are perfect for various celebrations and gatherings.
For example, pairing pecans with rich dark chocolate and a sprinkle of sea salt results in a sophisticated treat that is ideal for gifting or special occasions. Alternatively, mixing almonds with a hint of cinnamon evokes a warm, cozy vibe, making it perfect for festive gatherings.
Always keep in mind the balance of flavors. The sweetness from the caramelized sugar should harmonize well with the nuttiness of the nuts and any additional flavorings you incorporate. This thoughtful approach will elevate your praline to new heights of deliciousness, captivating everyone who tries it.
Proven Techniques for Creating Praline in Your Kitchen
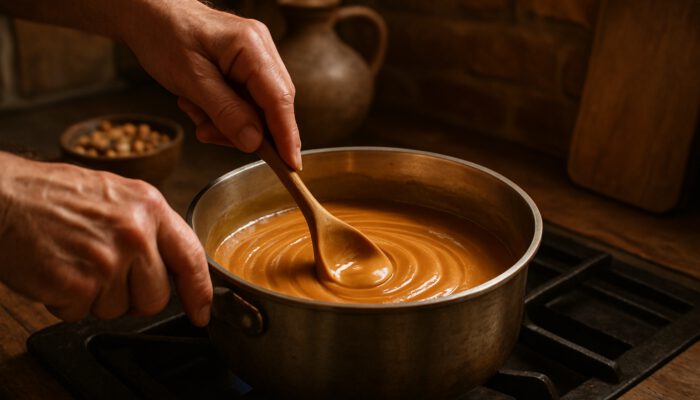
Real-world examples of effective techniques can guide you in achieving professional-quality pralines right in your kitchen. One effective method involves using a heavy-bottomed saucepan, which ensures even heat distribution and helps prevent hot spots that can lead to burning.
Another technique is to stir the sugar mixture gently yet consistently. This practice promotes even dissolution and uniform caramelization of the sugar. Once the sugar begins to turn golden, it’s crucial to stop stirring, as continued agitation can lead to crystallization, compromising the smooth texture you desire.
Finally, cooling your praline on a silicone mat or parchment paper makes for easy removal and prevents sticking. These straightforward yet effective techniques can elevate your homemade pralines to a level that rivals those found in gourmet shops.
Step-by-Step Guide for Beginners in Praline Making
For those new to praline making, it may seem challenging at first, but with actionable steps, it becomes a manageable endeavor. Start by gathering all your ingredients and tools before you begin cooking. This level of preparation ensures a seamless cooking process without interruptions, allowing you to focus entirely on the delicious task at hand.
Next, follow a straightforward recipe, paying close attention to the temperature of the sugar as it heats. Utilize a candy thermometer to monitor the sugar temperature closely. As soon as it reaches the desired temperature, quickly add the nuts and stir the mixture to coat them evenly with the caramel.
Once you have poured the mixture onto a prepared surface, allow it to cool completely before breaking it into pieces. Don’t be discouraged if your first attempt isn’t perfect; with practice, you will grow more skilled and confident in creating delicious homemade pralines that everyone will love.
Critical Cooking Techniques for Achieving Praline Success
How to Heat Sugar Correctly for Praline Creation
Properly heating sugar is a fundamental technique in the creation of praline. Gradually increasing the heat to avoid scorching is essential, as burned sugar can ruin both flavor and texture. Start with medium heat, allowing the sugar to dissolve completely before you raise the temperature.
As the sugar heats, keep an eye out for color changes. It should transition from clear to a light amber and then to a rich golden hue. This process requires patience, as rushing can lead to burnt sugar. Use a candy thermometer to track the temperature, aiming for around 170°C for perfect caramelization.
Once the sugar reaches the desired color, promptly remove it from the heat to prevent further cooking. This meticulous attention to detail will ensure that your praline achieves that ideal balance of sweetness and crunch that everyone craves.
How to Mix Nuts Evenly into the Sugar Mixture
Incorporating nuts into the hot sugar mixture is a vital step that requires swift action for the best results. As soon as the sugar has reached the right temperature, promptly add your chosen nuts to ensure they get thoroughly coated in caramel.
Gently but quickly stir the mixture, ensuring that each nut is evenly coated in the caramel. This step is crucial since the sugar hardens rapidly once it is removed from heat. Your goal is to achieve an even coating that delivers a consistent texture throughout your praline.
If the mixture begins to harden before you finish mixing, briefly return it to low heat to soften it. This technique ensures that all nuts receive an even coating, resulting in a delightful crunch in every bite of your homemade praline.
Optimal Cooling Methods for Achieving Perfect Praline Texture
Cooling your praline mixture on suitable surfaces is crucial for obtaining the desired texture. After pouring the hot mixture onto a prepared surface, allow it to spread out evenly. Using a silicone mat or parchment paper prevents sticking and facilitates easy removal once set.
Avoid rapid cooling methods like placing the hot mixture in the fridge or freezer, as this can lead to a grainy texture. Instead, let it cool at room temperature until it is fully hardened, which typically takes around 30 minutes but may vary depending on the ambient temperature and humidity.
Once cooled, gently break the praline into pieces, being careful to maintain the integrity of each piece. Using proper cooling techniques will yield a beautifully textured praline that is easy to serve and enjoy.
Effective Strategies for Crafting Homemade Praline
How to Scale Recipes for Larger or Smaller Batches
Scaling recipes up or down is a valuable skill in praline making that allows you to cater to different occasions. For large gatherings, you may find it necessary to double or triple the recipe. When you do so, remember to adjust your cooking time and equipment accordingly to achieve the best results.
For instance, utilizing a larger pot can help manage a bigger batch of sugar, ensuring even heating throughout. Conversely, for smaller batches, a smaller saucepan allows for better temperature control, which is especially crucial for caramelization.
Maintaining the quality and consistency of your praline is vital, regardless of the batch size. Keep an eye on the temperature and caramelization process, as these factors remain constant. With practice, you’ll find that scaling recipes becomes second nature, allowing you to create pralines for any occasion with ease.
Mastering Timing for Perfect Praline Making
Timing plays a critical role in the praline-making process. Each stage demands careful attention to ensure flawless results. From the moment you start heating the sugar, monitor it closely, as the transition from clear to caramel can occur rapidly, requiring vigilance.
When it comes time to add the nuts, timing is equally important. Mix them in just as the sugar reaches the desired color; delaying this step could result in a hardened mixture that won’t coat the nuts evenly, compromising the final product.
Allow adequate cooling time; rushing this stage can lead to a chewy instead of a crunchy texture. By mastering timing, you ensure that your praline turns out perfectly every time, showcasing your impressive kitchen skills to family and friends.
What Methods Can I Use to Test Sugar Doneness Effectively?
Testing the doneness of your sugar mixture is essential for successfully forming praline. One effective method is the cold water test: drop a small amount of heated sugar into a glass of cold water. If it forms a hard ball, it is ready for the next step.
Alternatively, you can rely on your candy thermometer. The ideal temperature for praline is approximately 170°C. This precise measurement ensures that the sugar has reached the perfect stage for caramelization without burning, resulting in a delightful texture.
Regularly testing the mixture during cooking helps you avoid overcooking or undercooking, which can lead to disappointing results. With practice, you’ll develop an instinct for knowing when your sugar is just right, leading to consistently excellent results in your homemade praline.
Recommended Storage Solutions for Keeping Praline Fresh
Properly storing your praline creations is key to maintaining their freshness and delightful crunch. Once cooled, place the pralines in airtight containers to prevent moisture absorption, which can result in a chewy texture that detracts from their appeal.
Consider utilizing glass jars or plastic containers with tight-fitting lids, as these options effectively protect against humidity and air exposure. Label your containers with the date to keep track of freshness, ensuring you indulge in your pralines while they are at their best.
Store your pralines in a cool, dry area away from direct sunlight. This simple storage solution will keep your pralines fresh and crunchy for up to two weeks, allowing you to enjoy your delicious homemade treats over time without losing quality.
Understanding How Temperature Affects Praline Outcomes
The Importance of Monitoring Heat Levels During Cooking
Monitoring heat levels throughout the cooking process is vital for achieving perfect praline. Gradually heating the sugar helps avoid scorching, which can ruin both flavor and texture. Start with medium heat, allowing the sugar to dissolve completely before you increase the temperature.
As the sugar heats, observe the color change. It should shift from clear to a light amber and finally to a rich golden hue. Patience is required, as rushing can lead to burnt sugar. Use a candy thermometer to monitor the temperature, aiming for around 170°C for ideal caramelization.
Once the sugar reaches the desired color, promptly remove it from heat to prevent further cooking. This careful attention to detail is essential to ensure your praline achieves the perfect balance of sweetness and crunch that is so desirable.
How Room Conditions Impact Praline Consistency
Room conditions can significantly affect the cooling and setting of your praline. High humidity can cause the sugar to absorb moisture, resulting in a chewy texture instead of the desired crunch. If you live in a humid climate, consider utilizing a dehumidifier or air conditioning to maintain a controlled environment for your praline-making process.
Conversely, dry conditions may facilitate quicker cooling, which could necessitate adjustments to your cooling time. Monitor the setting of your praline closely, as it may harden faster than expected in dry air conditions.
Being aware of your kitchen’s environmental conditions allows you to make necessary adjustments, ensuring that your praline turns out perfectly every time, regardless of external weather influences.
Adjusting Temperatures for Consistency in Praline Making
Making adjustments to temperatures based on your observations is crucial for refining your praline-making process. Each batch may behave differently due to variations in humidity, sugar type, or even the size of your saucepan.
If you notice that your sugar is caramelizing too quickly, reduce the heat slightly. Conversely, if it’s taking too long, you can increase the heat a bit, but be cautious not to scorch the sugar. This level of flexibility will lead to improved results over multiple attempts.
Keep a record of your adjustments each time you make praline. This practice helps you identify patterns and refine your technique, ultimately resulting in consistently excellent homemade pralines that will impress everyone.
Maintaining Precise Temperature Control for Praline Perfection
Utilizing a reliable thermometer to monitor the sugar mixture is essential for achieving the right crystallization, which prevents issues like undercooking or overcooking that can ruin your praline’s texture.
Aim for a temperature of approximately 170°C for perfect caramelization. At this stage, the sugar will have reached the ideal consistency for evenly coating the nuts. Avoid relying solely on visual cues, as sugar can transition quickly from perfect to burnt if not watched closely.
By ensuring precise temperature control, you can guarantee that your praline turns out beautifully every time. This attention to detail is what distinguishes amateur attempts from professional-quality results in your praline-making journey.
The Effects of Rapid Cooling on Praline Final Texture
Rapid cooling techniques can significantly impact the final texture and appearance of your praline. Cooling the mixture too quickly may result in a grainy texture instead of the smooth consistency you desire.
To prevent this, allow the praline to cool gradually at room temperature. If you are pressed for time, you can place it in a cooler part of your kitchen, but avoid the fridge or freezer, as these can shock the mixture and lead to undesirable outcomes.
Careful management of cooling techniques ensures that your praline maintains its glossy finish and delightful crunch. This attention to detail is essential for achieving optimal results in your homemade praline that will leave everyone wanting more.
Final Steps for Perfecting Your Praline Creations
How to Break Praline into Perfect Portions
Breaking your cooled praline into even portions is the final step in the praline-making process. Once the mixture has hardened, use a sharp knife or a mallet to break it into pieces. Aim for uniform sizes to create a polished appearance, which also makes serving much easier for you and your guests.
Consider using a cutting board or a clean surface to avoid damaging your countertops while breaking the praline. If the praline is too hard, gently warm it slightly to facilitate breaking. This technique helps maintain the integrity of each piece, ensuring they remain visually appealing and intact.
After breaking, arrange the pieces attractively on a serving platter or in a gift box. This thoughtful presentation adds an extra touch, making your homemade praline even more enticing for guests or special occasions.
Storage Solutions to Keep Your Praline Fresh and Delicious
To preserve your praline’s freshness over time, consider these key storage tips. First and foremost, store your praline in an airtight container to prevent moisture absorption, which can lead to a chewy texture that detracts from its appeal.
Here are some effective storage solutions:
- Glass jars with tight-fitting lids
- Plastic containers with airtight seals
- Vacuum-sealed bags for long-term storage
- Avoid exposure to direct sunlight and heat sources to maintain quality
Label your containers with the date to keep track of freshness. Proper storage will maintain your pralines’ crunchiness and deliciousness for up to two weeks, allowing you to savor your homemade treats at their best.
Creative Serving Ideas to Showcase Your Praline
Implementing creative serving ideas can greatly enhance the visual appeal of your pralines and make them more inviting for guests. Consider presenting them on a decorative platter, garnished with fresh fruits or edible flowers for a stunning display. This not only enhances the visual aspect but also elevates the overall experience for everyone enjoying your treats.
Another option is to serve pralines alongside a selection of cheeses or charcuterie. The sweet and salty contrast creates a delightful pairing that will surprise and delight your guests. For a more casual setting, consider placing pralines in small paper cups or bags for convenient snacking that everyone will appreciate.
These unique serving ideas will make your homemade pralines a standout feature at any gathering, ensuring they are not just a treat but a memorable experience for everyone involved.
Thoughtful Packaging Ideas for Gifting Your Praline
Selecting suitable packaging options is vital for protecting your pralines while enhancing their visual appeal for gifting. Consider using decorative boxes, clear cellophane bags, or even mason jars for a rustic and charming touch.
When packaging, ensure that the pralines are separated with parchment paper or tissue to prevent them from sticking together. This attention to detail not only keeps them intact but also adds an extra layer of thoughtfulness and care to your gift.
Take into account the climate conditions in your area when choosing packaging. In warmer climates, select packaging that can withstand heat and humidity without compromising the quality of your pralines. Thoughtful packaging will transform your pralines into irresistible gifts for any occasion, showcasing your culinary skills and creativity.
Frequently Asked Questions About Crafting Praline
Which Nuts Are Best for Creating Praline?
Pecans, almonds, and hazelnuts are excellent choices for praline due to their rich flavors and appealing textures. Fresh, high-quality nuts will significantly enhance the overall taste and crunch of your praline creations.
Can I Use Brown Sugar Instead of White Sugar in Praline?
Yes, brown sugar can be an excellent alternative in praline making, imparting a deeper flavor profile due to its molasses content. This substitution may slightly alter the color and taste, creating a unique variation that stands out.
How Do I Know When the Sugar Is Ready for Praline?
You can test sugar doneness using a candy thermometer, aiming for a temperature of around 170°C. Alternatively, drop a small amount into cold water; it should form a hard ball when ready, indicating it is perfect for praline.
What Should I Do If My Praline Turns Out Too Hard?
If your praline is overly hard, you can gently warm it slightly to soften it. This adjustment will make breaking it into pieces easier without compromising its structure, allowing you to serve it beautifully.
What Is the Best Method for Storing Pralines?
Store pralines in an airtight container in a cool, dry place away from direct sunlight. This will help maintain their freshness and crunch for up to two weeks, ensuring you can enjoy your delightful treats for longer.
Is It Possible to Add Flavorings to My Praline?
Absolutely! Incorporating flavorings like vanilla extract, sea salt, or even spices can elevate the taste of your praline, leading to unique and delicious variations that everyone will love.
How Long Does It Take for Praline to Cool Completely?
Typically, praline takes around 30 minutes to cool completely at room temperature. Avoid rapid cooling methods, as they can lead to undesirable texture changes and affect the final product’s quality.
Is Praline an Ideal Gift Option for Special Occasions?
Absolutely! Praline makes a fantastic gift. Package it in decorative boxes or jars, ensuring it is protected and visually appealing for recipients, making for a thoughtful and delicious present.
Can I Use a Microwave to Make Praline?
While it is indeed possible to use a microwave for making praline, traditional stovetop methods offer better control over temperature and caramelization, resulting in superior outcomes and flavors.
What Can I Do with Leftover Praline After Making It?
Leftover praline can be crushed and utilized as a topping for desserts, ice cream, or incorporated into baked goods for added crunch and flavor, ensuring nothing goes to waste while adding a delightful twist to other dishes.
Join us on Facebook for more culinary inspiration!
The post How To Make Homemade Praline From Scratch: Simple Steps appeared first on https://cookinggods.com


No responses yet