Expert Strategies for Selecting the Best Ingredients for Your Spring Vegetable Tart
Maximize Flavor by Choosing Seasonal Vegetables
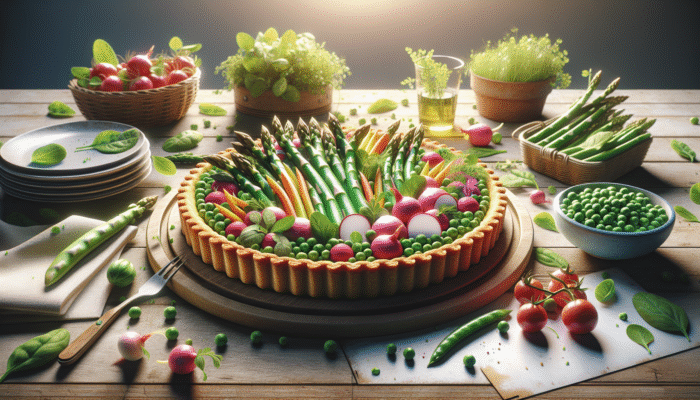
The vibrant colours and fresh flavours that seasonal vegetables bring to your dish are essential for crafting a mouthwatering spring vegetable tart. When selecting your vegetables, it’s crucial to consider what is in season in your local area, as this impacts both the taste and texture of your tart. During spring, you can find delightful options like asparagus, peas, radishes, and baby spinach. These vegetables not only taste significantly better when in season, but they also provide essential nutrients that contribute to a healthy and vibrant lifestyle, enhancing your overall culinary experience.
Choosing organic vegetables can greatly enhance the flavour profile of your tart. Organic produce is often picked at peak ripeness, ensuring maximum sweetness and crunch. To discover a fantastic variety of fresh, in-season vegetables, consider visiting local farmers’ markets or joining a community-supported agriculture (CSA) programme. Let your culinary creativity shine by experimenting with unique varieties such as heirloom radishes or rainbow chard. This not only boosts the visual appeal of your tart but also introduces an array of intriguing textures and flavours that can elevate your dish to new heights.
Pay attention to the balance of colours and textures in your tart. Strive for a delightful mix of leafy greens, crunchy vegetables, and sweet options to create a dynamic eating experience. For example, pairing tender asparagus with vibrant green peas and earthy mushrooms not only satisfies the palate but also results in a visually striking presentation that is sure to impress your dinner guests and create memorable moments around the table.
Selecting the Perfect Pastry for Your Tart Base
The foundation of your tart is just as vital as the filling, making it essential to dedicate time to selecting the appropriate pastry. A high-quality pastry can elevate your dish to new heights, so aim for flaky options like puff pastry or shortcrust, which complement a spring vegetable tart beautifully. Opt for products made with real butter to achieve a rich flavour that pairs wonderfully with your fresh vegetables, enhancing every bite with a delightful buttery essence.
For those feeling adventurous, consider crafting your own pastry from scratch. Making your own pastry allows you to control the ingredients and achieve the perfect texture. A simple homemade shortcrust pastry, made from flour, butter, and a pinch of salt, results in a buttery, crumbly base that stands up beautifully against the moisture from your vegetables. Don’t hesitate to experiment with wholemeal flour for a nuttier flavour or incorporate a dash of herbs for an unexpected twist that makes your tart uniquely yours.
For those short on time, store-bought pastry can still yield impressive results. Just be sure to choose a reputable brand known for its quality. Always scrutinize the ingredient list; avoiding hydrogenated fats or preservatives can enhance both the flavour and health quotient of your dish. Remember, when rolling out the pastry, it should be even, neither too thick nor too thin, to provide the best foundation for your tart, ensuring a perfectly baked creation that brings joy to the table.
Elevate Your Tart with Essential Herbs and Spices
Herbs and spices play a crucial role in how to cook a spring vegetable tart, acting as the unsung heroes that elevate the dish by enhancing the natural flavours of your vegetables without overwhelming them. Fresh herbs like thyme, chives, and basil are excellent choices for a spring tart. The earthy notes of thyme complement asparagus beautifully, while chives introduce a hint of onion flavour that pairs seamlessly with a variety of vegetables, creating a harmonious taste experience.
Incorporating spices like nutmeg or black pepper can also add depth to your tart. A pinch of nutmeg enhances the creaminess of the filling, while freshly cracked black pepper introduces a subtle heat that rounds out the flavours perfectly. It’s essential to strike the right balance; you want the herbs and spices to elevate the dish without overshadowing the fresh tastes of your vegetables, creating a delightful harmony on the palate.
The use of herbs and spices isn’t solely about flavour; it’s also about crafting a sensory experience. The aroma of freshly chopped herbs can awaken your senses, making the cooking process even more enjoyable. Consider cultivating a herb garden at home, even if it’s just a small windowsill garden. Fresh herbs add an aromatic touch that evokes the essence of the season and encourages you to use them generously in your cooking, making every dish a celebration of flavour.
Choosing the Right Cheese to Enhance Your Tart Experience
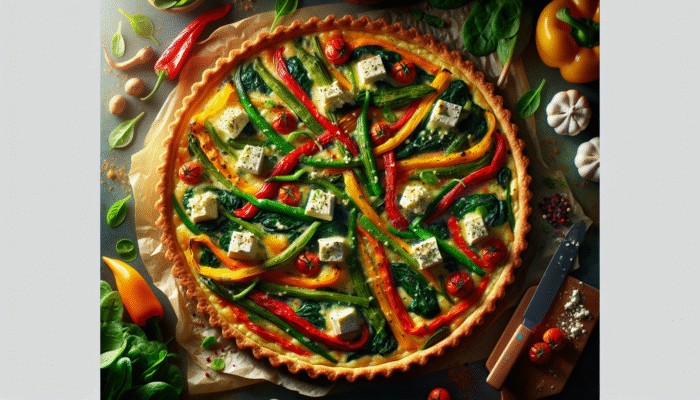
Incorporating cheese into your spring vegetable tart adds a luscious richness that is vital to its overall flavour profile. When selecting cheese, choose varieties that melt beautifully and enhance the overall flavours of your dish. Feta, goat cheese, and mozzarella are all exceptional choices that can elevate your tart and provide a delightful contrast to the fresh vegetables.
Feta cheese, with its creamy, tangy profile, pairs wonderfully with earthy vegetables like spinach and roasted peppers. Meanwhile, goat cheese introduces a creamy texture with a hint of tanginess, making it another fabulous option for enhancing the flavour of your tart. For a milder choice, mozzarella offers a gooey, stretchy texture that melds beautifully with fresh vegetables, creating a satisfying mouthfeel.
Don’t hesitate to experiment by combining different cheeses for a complex flavour profile. A mixture of goat cheese and mozzarella can provide both creaminess and stretch, while a sprinkle of Parmesan on top before baking can create a crunchy, flavourful crust. For a gourmet touch, consider using a local artisan cheese, which not only supports local producers but also adds a unique element to your dish, showcasing your commitment to quality ingredients.
When selecting cheese, be mindful of dietary restrictions. Many individuals are lactose intolerant or have dairy allergies. In such cases, plant-based cheese alternatives can be used, allowing everyone to enjoy your delightful creation without compromise, making your tart a versatile dish perfect for various dietary needs.
Mastering the Pastry Preparation Process for a Flawless Tart
Rolling Out the Perfect Dough for Your Tart Base
Creating the perfect tart begins with rolling out your pastry. Achieving an even thickness is critical to ensure that your pastry cooks uniformly without becoming overly tough or soggy. Start by lightly flouring your work surface to prevent sticking, and be gentle as you roll out the dough. If you're using a pre-made pastry, allow it to sit at room temperature for a few minutes to soften, making it easier to roll and ensuring a seamless rolling process.
Aim for a thickness of approximately 3mm to 5mm, which provides enough structure to support the filling without overwhelming the tart with excessive dough. If you roll it too thin, it may break during assembly; too thick, and it can yield a chewy, dense crust. Use a rolling pin to gently flatten the dough, applying even pressure and rotating the dough as you go to maintain a circular shape that fits perfectly into your tart pan.
Once rolled out, carefully transfer the dough to your tart pan, ensuring it fits snugly into the edges. Avoid stretching the pastry, as this can lead to shrinkage during baking. Trim any excess dough hanging over the edges, but leave a little extra to crimp the edges later. This attention to detail ensures your pastry looks as beautiful as it tastes, setting the stage for a stunning spring vegetable tart.
Mastering Blind Baking Techniques for a Perfect Tart Base
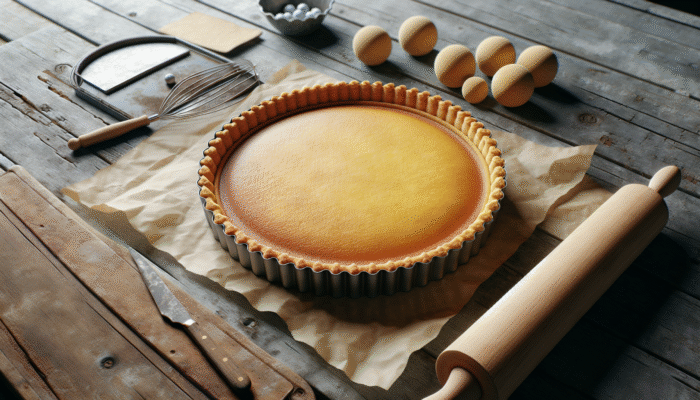
Blind baking is a crucial technique in how to cook a spring vegetable tart, particularly to prevent a soggy bottom. This method involves pre-baking the pastry before adding the filling. Start by preheating your oven to a moderate temperature, ensuring it’s at the right level for even baking. Line your tart with parchment paper and fill it with baking weights or dried beans to keep the pastry from puffing up during baking, allowing it to maintain its shape.
Bake the pastry for about 15-20 minutes, or until it begins to turn a light golden colour. The weights prevent the crust from rising while allowing the bottom to cook through. Once the edges are lightly coloured, remove the weights and parchment paper. If the base has puffed up, gently press it down with a spatula before returning it to the oven for an additional few minutes until the base is fully cooked and lightly golden, ensuring a perfect tart base.
Blind baking not only preserves the pastry's texture but also enhances its flavour. This technique is especially beneficial for moist fillings such as those found in vegetable tarts. A well-baked shell ensures that your tart remains crispy even when filled with delicious, moisture-laden vegetables, creating a delightful contrast that enhances the overall dining experience.
Finishing Touches: Trimming and Crimping Edges for Elegance
The finishing touches on your tart can truly set it apart, beginning with trimming and crimping the edges. After blind baking, assess the edges of your pastry. Trim any excess dough to create a clean line, allowing for a neat presentation that enhances the visual appeal. An uneven edge can detract from the overall aesthetic, so take your time to ensure a tidy finish that reflects your culinary skill.
Crimping the edges not only enhances the visual appeal but also helps to secure the filling in place during baking, preventing any spillage. To crimp, use your finger and thumb to pinch the edges into a decorative pattern. This can be as simple or ornate as you desire, depending on the occasion and your personal style. A beautifully crimped edge can give your tart a professional look, showcasing the care and attention you’ve put into your cooking and making it a memorable centerpiece for any meal.
Additionally, consider brushing the edges with a beaten egg or milk before baking. This step will give your pastry a golden, glossy finish that makes it even more appealing, enticing your guests before they even take a bite. The combination of a clean trim and a decorative crimp elevates your tart, transforming it from a mere meal into a work of art that reflects your culinary expertise and creativity.
Efficiently Prepping the Vegetables for Your Tart
Thorough Washing and Precision Slicing Techniques for Freshness
The preparation of your vegetables is fundamental to the success of how to cook a spring vegetable tart. Begin by thoroughly washing your vegetables under cold running water to eliminate any dirt or pesticides. This step is particularly vital for leafy greens, which can harbour grit. For root vegetables like carrots or radishes, gently scrub them to ensure they are clean while retaining their natural skin, enhancing both flavour and nutrition.
Once washed, uniform slicing is key to achieving even cooking. Aim for slices that are similar in thickness to ensure they cook at the same rate, resulting in a harmonious texture throughout the tart. For example, cut asparagus into pieces about 1-2 inches long, while bell peppers can be sliced into strips or small chunks. The visual appeal of your tart is significantly enhanced by well-cut vegetables, making it more inviting and appetizing for your guests.
Consider the order of your vegetables as well. Place the denser vegetables, like carrots or potatoes, towards the bottom, and lighter, more delicate items, like baby spinach or herbs, on top. This arrangement not only creates a pleasing aesthetic but also ensures that all ingredients cook optimally, allowing the flavours to meld beautifully for a delightful culinary experience that showcases the best of spring produce.
Blanching for Vibrant Colour and Ideal Texture
Blanching is a valuable technique that can elevate your spring vegetable tart by preserving the vibrant colours and crisp textures of your vegetables. To do this, bring a pot of salted water to a boil and prepare an ice bath—this will stop the cooking process and lock in both colour and crunch, ensuring your vegetables look and taste their best.
Once the water reaches a rolling boil, add your vegetables in batches. For instance, blanch asparagus for about two minutes, while peas may only require one minute. After the designated time, promptly transfer the vegetables to the ice bath using a slotted spoon. This quick shock halts cooking and preserves the bright, fresh colours that make your tart visually appealing and appetizing.
Blanching not only enhances the appearance but also improves the texture. This technique softens the vegetables slightly while retaining a tender-crisp bite. This balance ensures that when baked in the tart, they don’t become mushy, allowing each ingredient to shine in its own right, contributing to a satisfying and enjoyable eating experience for everyone at the table.
After blanching, pat the vegetables dry to remove any excess moisture before adding them to your tart. This step is essential; excess moisture can lead to a soggy pastry base, which is something we all want to avoid. A well-prepped vegetable filling is the foundation of a great tart, ensuring a delightful and memorable dish that showcases your culinary skills.
Artfully Arranging Your Vegetables for Stunning Visual Appeal
Once your vegetables are blanched and dried, it’s time to showcase your artistic skills in arranging them. The arrangement of vegetables in your tart adds a stunning visual element, transforming it from a simple meal into a centrepiece that captivates the eye. Consider colours, shapes, and textures as you layer them on the pastry, creating a visually striking presentation.
Start with a base layer of vegetables that provide stability, such as sliced potatoes or carrots. Then, build upwards with lighter vegetables such as asparagus, greens, or even colourful bell peppers. Arranging the vegetables in a circular pattern or a spiral can create an eye-catching design that draws the eye and enhances the overall appeal of your tart.
Don’t hesitate to play with height and depth. Placing some vegetables at different angles can add dimension, creating an appealing presentation that invites curiosity and excitement. This artistic approach can elevate a simple dish into something that looks gourmet and professionally crafted, making it a memorable addition to any table setting.
Remember that the way you arrange your vegetables can also impact the distribution of flavours. Ensuring even coverage across the tart means every slice will feature a balanced mix of flavours and textures, providing a delightful eating experience for everyone at the table and showcasing the beauty of spring produce in each bite.
Drying Your Vegetables Thoroughly for Optimal Tart Texture
Moisture is the enemy of a crisp tart base, so drying your vegetables properly after washing and blanching is crucial. Excess moisture can lead to sogginess, which is something no one wants in a beautifully crafted tart. After blanching, use a clean kitchen towel or paper towels to pat your vegetables dry gently, ensuring they are ready to go into your tart without compromising the pastry’s integrity.
Take extra care with leafy greens, as they tend to retain more water. Ensuring that they are dried thoroughly will help maintain the structure of the pastry. If you’re working with particularly watery vegetables, like zucchini, consider salting them lightly and letting them drain in a colander for about 15 minutes. This process draws out additional moisture, allowing for a drier filling overall, which is essential for achieving the perfect tart texture.
By prioritizing proper drying techniques, you’re setting your tart up for success. Imagine slicing into your tart to discover a perfectly crisp base with fresh, vibrant vegetables that retain their integrity. That’s the result of careful preparation and attention to detail, ensuring a delightful dining experience for all and showcasing the beauty of your culinary creation.
Seasoning Your Vegetables for Maximum Flavor Impact
Seasoning is the magic ingredient that can elevate your spring vegetable tart from good to extraordinary. Before arranging your vegetables on the pastry, take a moment to season them with salt, pepper, and your choice of herbs. This step not only enhances flavour but also prepares your vegetables for their starring role in the tart, ensuring they shine in every bite.
Begin with a light sprinkle of sea salt to draw out the natural flavours of the vegetables. Salt enhances sweetness and balances bitterness, creating a harmonious taste profile that captivates the palate. Freshly cracked black pepper adds a subtle kick that can awaken the senses and invigorate the dish, making each bite more exciting and enjoyable.
Incorporate herbs that resonate with the flavours of your chosen vegetables. For instance, a hint of thyme pairs beautifully with asparagus, while dill complements peas remarkably well. Tossing the vegetables gently in a bowl with your selected seasonings ensures even distribution, so every bite is flavour-packed and delivers a delightful burst of freshness.
Remember, seasoning is not a ‘one and done’ approach. It’s essential to taste as you go. After adding your seasonings, take a moment to sample a piece of your prepared filling. This practice allows you to adjust flavours before they’re baked into the tart, ensuring a delightful result that pleases the palate and showcases your culinary expertise.
Creating the Ideal Filling for Your Spring Vegetable Tart
Mixing Together the Essential Ingredients for a Cohesive Base
The filling is the heart of your spring vegetable tart, making the selection and combination of ingredients crucial for a successful dish. Begin by whisking together eggs, cream, and cheese to create a cohesive base that binds the vegetables together beautifully. The eggs provide structure, while the cream adds richness and a delightful creaminess that enhances the overall experience of your tart, making it a comforting and satisfying meal.
When selecting your cream, opt for a heavy or thickened variety that will create a luxuriously smooth filling. This choice ensures that your tart has a velvety texture that contrasts beautifully with the crisp pastry. As for cheese, choose one that complements your vegetable selection while providing that delightful gooeyness we all love in a well-crafted tart.
Consider adding a splash of milk or a dollop of sour cream to your mixture for added creaminess and depth. Mixing the filling ingredients together thoroughly ensures that you achieve a uniform texture, preventing any lumps that could detract from the overall quality. This smooth filling will envelop your vegetables, creating a cohesive blend of flavours that makes every bite enjoyable and satisfying for your guests.
Don’t hesitate to experiment with different ratios of egg to cream to find your preferred level of richness. A classic ratio is about three large eggs to one cup of cream, but adjusting based on your taste can lead to delightful results. This base will serve as the foundation for your tart, so take the time to get it just right, ensuring a delectable outcome that showcases your culinary skills.
Perfectly Seasoning Your Filling for Enhanced Flavor
Once your filling base is combined, it’s time to season it to perfection. Seasoning the filling is just as important as seasoning the vegetables, ensuring that every layer of your tart is flavourful and cohesive. Aim for a balance that enhances the overall flavour without overwhelming the dish. Start with a pinch of salt and freshly cracked black pepper, adjusting to taste as you mix.
Incorporate a blend of herbs that resonate with the spring theme and enhance the overall experience. Fresh parsley, dill, or chives can add a burst of freshness that pairs beautifully with the creaminess of the filling, creating a delightful contrast with the vegetables. A touch of nutmeg can provide warmth and depth, making it a classic pairing with egg-based dishes that enriches the flavour profile.
Taste as you go! This is the secret to ensuring that your filling is perfectly seasoned. A well-balanced filling will provide a delightful contrast to the fresh, vibrant vegetables in your tart, creating an overall harmonious dish that is both satisfying and memorable for anyone who enjoys it.
Incorporating some cheese into the filling mixture can also enhance flavour. As the tart bakes, the cheese melts, creating a rich, gooey texture that adds to the overall satisfaction. This blend of flavours is a key element of what makes a spring vegetable tart so appealing, offering a delightful experience for all.
Carefully Incorporating Vegetables into Your Filling for Harmony
Now it’s time to bring your luscious filling and vibrant vegetables together harmoniously. Gently fold the blanched and seasoned vegetables into the filling mixture, ensuring even distribution without breaking them apart. This step is crucial, as you want every slice of your tart to contain a delightful mix of both filling and vegetables, creating a balanced and enjoyable experience for your guests.
Using a spatula, start from the bottom of the bowl and gently lift the mixture over the vegetables. This technique ensures that everything is evenly coated, allowing the flavours to meld beautifully while maintaining the integrity of the individual vegetables. Be careful not to overmix; you want to retain the textures of each ingredient to create a visually appealing tart that invites everyone to dig in.
Consider the colours and shapes of the vegetables as you fold. A beautiful visual presentation results in a more enticing dish that captivates the eye. The contrast of vibrant greens against the creamy filling creates a stunning tableau that draws the eye and enhances the overall appeal of your tart, making it a true showstopper at any gathering.
Once you’ve folded everything together, take a moment to taste the mixture once more, adjusting seasonings as needed. The filling should be well-balanced and flavourful, ensuring that each bite delivers a delightful burst of deliciousness that showcases the best of seasonal produce and your culinary talents.
Adding a Subtle Kick: Incorporating Heat into Your Filling
For those who enjoy a little zing in their dishes, introducing a touch of heat into your filling can elevate your spring vegetable tart to new heights. A sprinkle of chilli flakes or a dash of hot sauce can introduce a subtle kick that adds complexity to the overall flavour profile, making each bite more exciting and memorable.
Begin with a small amount; a pinch of chilli flakes can go a long way. As you mix the filling, taste it to ensure that the heat is balanced and not overpowering. The key is to enhance the flavours without overshadowing the freshness of the vegetables, creating a delightful contrast that keeps your guests coming back for more.
Consider pairing the heat with complementary flavours. For example, if your tart includes sweet bell peppers, the added heat will create a delightful contrast, making each bite interesting and dynamic. The heat from the chilli can also bring out the natural sweetness of vegetables, creating an enhanced flavour experience that delights the palate and leaves a lasting impression.
If you prefer a milder approach, consider using a milder hot sauce or a sprinkle of smoked paprika for a subtle warmth without overwhelming the dish. This flexibility allows you to tailor the heat level to suit your taste, ensuring that your spring vegetable tart is a crowd-pleaser that everyone will enjoy.
Ensuring a Smooth Texture for Your Filling
Achieving a smooth and creamy filling is essential for a successful tart that delights the senses. After folding in the vegetables, take a moment to blend the filling mixture thoroughly. Using a hand mixer or a blender can ensure that your filling is silky smooth and free from lumps, resulting in a luxurious texture that envelops the vegetables beautifully.
Take care not to over-blend; you want a smooth consistency, but it’s equally important to maintain the integrity of the vegetables. A few pulses should suffice to achieve the desired texture. The goal is to create a filling that is cohesive but still features delightful bites of vegetables throughout, offering a satisfying contrast that enhances the overall enjoyment of each slice.
This smooth filling not only enhances the mouthfeel but also creates a beautiful contrast against the crisp pastry. The combination of textures is what makes each bite satisfying and enjoyable, providing a delightful culinary experience that showcases the best of your spring vegetable tart.
Before pouring the filling into the tart, take a moment to taste it one last time. A well-balanced, smooth filling will elevate your tart, ensuring every slice is a perfect blend of flavours and textures that leave a lasting impression on everyone who enjoys it. This meticulous attention to detail is what transforms your spring vegetable tart from a simple dish into a culinary masterpiece.
Assembling Your Spring Vegetable Tart for Optimal Presentation
Layering the Filling for an Impressive Presentation
With your pastry perfectly prepared and your luscious filling ready, it’s time for the exciting part—assembling your spring vegetable tart. Begin by pouring the filling mixture over the blind-baked pastry. Aim for an even distribution, ensuring that the filling reaches the edges of the tart for an appealing presentation that showcases your hard work.
Utilise a spatula to gently spread the filling if necessary, ensuring that all those vibrant vegetables are nestled evenly throughout. This not only enhances the visual appeal but also guarantees that each slice of tart is flavour-packed and provides a delightful eating experience for everyone at the table.
As you layer, take care not to overfill; leaving a small gap at the top can help prevent spillage during baking. The filling will expand slightly, and this space allows for even cooking without any messy overflow, ensuring a beautifully baked tart that highlights the freshness of your ingredients.
Once layered, take a moment to admire your creation. The combination of colours from the vegetables against the creamy filling is visually stunning, making it a dish that not only tastes incredible but looks impressive as well, perfect for serving at gatherings or special occasions where presentation matters.
Arranging Beautiful Toppings for Added Visual Appeal
To elevate your tart even further, consider adding additional vegetable slices or herbs on top before baking. This decorative touch not only enhances the visual appeal but also adds layers of flavour to the final dish. For instance, placing thinly sliced tomatoes or zucchini on top can create an enticing layer that speaks to the freshness of the dish, inviting everyone to enjoy it.
Use a light hand when arranging toppings; the goal is to create an attractive design that complements the filling without overwhelming it. Fresh herbs like thyme or basil can be scattered on top for a burst of colour and flavour, making your tart even more inviting and appealing to your guests.
This step allows for creativity; consider arranging the toppings in a pattern or spiral for an artistic touch that showcases your culinary flair. A well-decorated tart is not only a feast for the taste buds but also for the eyes, making it a memorable dish for any occasion that leaves a lasting impression on everyone who enjoys it.
Once arranged, give everything a gentle press to ensure the toppings adhere to the filling. This will help keep them in place during baking and ensure a beautiful presentation when it comes time to slice and serve, showcasing the meticulous care you’ve put into your culinary creation.
Ensuring Even Distribution for Optimal Baking Results
To ensure that your tart bakes evenly, it’s crucial to check the distribution of both the filling and toppings before placing it in the oven. Look for any imbalances or clumps that could lead to uneven cooking, which can affect the overall quality of your tart.
Gently shake the tart pan from side to side; this can help settle the filling and toppings into an even layer. If you notice any areas that seem overpacked or sparse, adjust them as necessary. This simple step can make a significant difference in the final outcome, ensuring that every bite delivers a consistent experience that highlights the best of your ingredients.
Even distribution is particularly important for cooking times. An evenly filled tart will bake more consistently, allowing the pastry to crisp up while the filling sets perfectly. Taking the time to ensure that everything is well-distributed will lead to a beautifully baked tart that showcases the freshness of your ingredients and enhances the overall dining experience for everyone at the table.
With everything in place, your tart is ready to bake. This meticulous attention to detail ensures a dish that not only looks spectacular but tastes divine, giving you the satisfaction of knowing you’ve created something truly special that will be enjoyed by all.
Baking Your Spring Vegetable Tart to Perfection
Setting the Optimal Temperature for Even Baking
The key to achieving a beautifully baked spring vegetable tart lies in setting your oven to the right temperature. Preheating your oven is a crucial step that ensures even cooking throughout the tart. Aim for a moderate temperature, typically around 180°C (or 350°F). This allows the pastry to cook through while ensuring that the filling sets perfectly without burning, resulting in a delicious and satisfying dish.
Using an oven thermometer can help you verify that your oven is at the correct temperature. An oven that is too hot can lead to a burnt crust, while one that is too cool may result in a soggy base. Maintaining an even temperature allows the pastry to crisp up beautifully, creating the ideal contrast between the flaky crust and the creamy filling that everyone will love.
Before placing your tart in the oven, take a moment to check that the oven rack is positioned in the centre. This ensures that heat circulates evenly around the tart, preventing any hot spots that could burn certain areas. This attention to detail will pay off with a perfect bake that impresses everyone at the table.
Keeping the oven door closed during baking is also important. Every time you open the door, heat escapes, which can affect the cooking time and overall results. Be patient and allow your tart to bake undisturbed until it reaches that perfect golden hue, ensuring a delightful outcome that reflects your culinary skills.
Monitoring the Baking Time for Ideal Results
As your tart bakes, monitoring the time is essential to achieving a golden, crisp crust that everyone will love. Generally, a spring vegetable tart will take about 30-40 minutes to bake, but keep an eye on it as it approaches the final baking time. Every oven is different, so your tart may require slight adjustments to achieve the desired outcome.
Around the 25-minute mark, begin checking for doneness. The pastry should be golden brown, and the filling should appear set, with only a slight jiggle in the centre. If the edges are browning too quickly, consider covering them with a strip of foil to prevent burning while allowing the filling to cook through, ensuring a beautifully baked tart.
Use this time to savour the delicious aromas wafting through your kitchen. The scent of fresh vegetables mingling with the buttery pastry is a sign that you’re on the right track to creating a mouthwatering dish that will delight everyone who has the pleasure of enjoying it.
Do not rush the process; a perfectly baked tart is worth the wait. Allowing the tart to fully bake ensures a firm filling and a crisp base, making each slice delightful to eat and memorable for all who gather around the table.
Checking for Doneness to Ensure Perfection
Determining whether your spring vegetable tart is fully cooked is a vital step in ensuring that your hard work pays off. To check for doneness, insert a toothpick or knife into the centre of the tart. If it comes out clean or with just a few moist crumbs, your tart is ready to be removed from the oven, signaling that it has reached its ideal state.
If you notice that the centre is still too wet, return it to the oven for an additional 5-10 minutes, checking periodically to ensure it doesn’t overcook. The filling should be fully set, with a slight jiggle indicating that it’s cooked through but not overdone, ensuring a delightful texture that everyone will enjoy.
Don’t overlook the edges of the pastry. They should be golden brown and crisp, providing that satisfying crunch with each bite. A well-cooked crust is crucial to the overall texture of your tart, so take the time to ensure it’s achieved the perfect colour and consistency that reflects your culinary skills.
Once checked, remove the tart from the oven and set it aside to cool. This resting period allows the filling to set completely, making slicing easier and preventing any spillage, ensuring a beautiful presentation that showcases your hard work.
Rotating the Tart for Even Browning
To promote even browning and prevent any areas from overcooking, consider rotating your tart halfway through the baking process. Ovens can have hot spots, which sometimes lead to uneven cooking. By rotating your tart, you can ensure that every side gets equal exposure to the heat, resulting in a beautifully baked dish that delights the senses.
This simple step can make a significant difference in the final outcome. For instance, if one side of your tart begins to brown quicker than the other, rotating it allows for a more uniform colour and texture that enhances the overall experience for everyone who enjoys it.
To rotate, carefully use oven mitts to turn the tart 180 degrees, ensuring that you maintain the integrity of the crust and filling. This small adjustment is a mark of a skilled cook, showing that you’re paying attention to every detail of the baking process, which is essential for achieving the perfect spring vegetable tart.
Keep in mind that rotating is about more than just appearance. It ensures that your tart is cooked evenly throughout, providing a better overall experience for anyone who is lucky enough to enjoy a slice that reflects the care and effort you’ve put into your cooking.
Properly Cooling Your Tart for Optimal Enjoyment
After your spring vegetable tart has finished baking, it’s important to cool it properly before serving. Allow the tart to cool in the tart pan on a wire rack for at least 15-20 minutes before attempting to slice it. This cooling period is essential for the filling to set firmly, making for cleaner slices that maintain their shape and presentation.
Trying to cut into a hot tart can lead to a messy presentation, with the filling spilling out and diminishing the visual appeal. Giving it time to cool ensures that the textures meld beautifully and provides a more enjoyable eating experience for everyone at the table, allowing them to appreciate your culinary skills.
Once cooled, you can remove the tart from the pan. Carefully run a knife around the edges to loosen it before gently lifting it out. For an elegant presentation, consider serving it on a decorative platter, garnished with fresh herbs or microgreens for added flair that enhances the overall experience.
As your guests admire your creation, the aroma of fresh vegetables and baked pastry will entice them to indulge. This beautiful tart, with its perfectly set filling and crisp crust, is not just a meal; it’s a celebration of seasonal flavours and your culinary skills, creating memorable moments around the table.
Cooling and Serving Your Spring Vegetable Tart
Cooling the Tart for Improved Texture and Flavour
Once your vegetable tart has emerged from the oven, resist the urge to slice into it immediately. Cooling the tart on a wire rack for at least 20-30 minutes is essential. This allows the filling to firm up, resulting in cleaner, more professional-looking slices that reflect your attention to detail. A properly cooled tart will maintain its shape, ensuring that each piece looks as good as it tastes, enhancing the overall dining experience.
The cooling process also allows the flavours to meld, creating a more cohesive taste experience that delights the palate. As it sits, the residual heat continues to cook the filling slightly, perfecting that silky texture you’ve worked hard to achieve, ensuring that every bite is a delight for your guests.
If you’ve used a delicate pastry, cooling is particularly vital. A hot tart can cause the crust to become soggy if it’s cut too soon, diminishing the quality of your dish. Allowing it to cool completely enhances the crispness of the pastry, giving you that satisfying crunch with each bite that everyone will love.
While the tart cools, consider setting the table or preparing accompaniments. A light salad or a dollop of crème fraîche can complement the flavours beautifully, enhancing the overall dining experience and making your meal even more memorable for everyone at the table.
Serving Suggestions for an Unforgettable Experience
When it comes time to serve your spring vegetable tart, presentation matters immensely. Carefully slice the tart into even pieces, showcasing the colourful layers of vegetables and the golden crust that reflects your culinary efforts. Serve it warm or at room temperature, as both options provide delightful experiences that will impress your guests.
Consider pairing your tart with a light green salad dressed with a citrus vinaigrette to balance the richness of the filling. The freshness of the salad beautifully complements the tart and brings a burst of flavour that enhances the entire meal, creating a delightful dining experience that everyone will remember.
When serving, think about garnishing your platter with edible flowers or fresh herbs. This not only adds a beautiful visual element but also reinforces the fresh, spring theme of your dish, making it even more appealing to your guests. They will appreciate the extra effort you’ve put into making the meal special and memorable.
Encourage your guests to savour each bite, enjoying the delightful textures and flavours that you’ve expertly crafted. This isn’t just food; it’s a celebration of spring produce and your culinary creativity, leaving everyone satisfied and impressed with your skills and attention to detail.
Storing Leftovers for Maximum Freshness and Enjoyment
If you find yourself with leftover spring vegetable tart, storing it properly is key to maintaining its quality. Allow the tart to cool completely before covering it gently with plastic wrap or foil to prevent drying out. Store it in the refrigerator for up to three days, ensuring that it remains fresh and delicious for later enjoyment that highlights your culinary efforts.
Reheating is simple; preheat your oven to a low temperature, around 150°C (or 300°F), and place the tart on a baking sheet for about 10-15 minutes, or until warmed through. This gentle reheating process helps to retain the crispness of the pastry while warming the filling evenly, allowing your tart to shine once again.
Alternatively, individual slices can be reheated in a microwave for quick enjoyment, though this may sacrifice some of the pastry’s crispness. Regardless of how you choose to reheat, your spring vegetable tart can continue to be a delightful meal that brings people together, showcasing the beauty of seasonal produce and your culinary skills.
Frequently Asked Questions About Making Spring Vegetable Tarts
Which vegetables are best for a spring vegetable tart?
Spring vegetables like asparagus, peas, radishes, and spinach are ideal for a spring vegetable tart. Their vibrant colours and fresh flavours shine when in season, enhancing the overall taste and presentation of your dish.
Can I use store-bought pastry for my tart?
Absolutely! High-quality store-bought pastry can save time and still yield delicious results. Just be sure to follow the preparation instructions for the best outcome, ensuring that your tart turns out beautifully and satisfies everyone’s taste buds.
How can I prevent a soggy tart base?
Blind baking your pastry before adding the filling is key to preventing sogginess. Ensure to cool the vegetables thoroughly and pat them dry after washing to minimize moisture, creating a crisp and delightful tart base that everyone will love.
Can I make the filling ahead of time?
Yes, you can prepare the filling a day in advance and store it in the fridge. Just mix it with the vegetables right before assembling the tart, ensuring that every component is fresh and flavourful for your guests to enjoy.
Is it possible to freeze the tart?
Yes, you can freeze the unbaked tart. Wrap it tightly in plastic wrap and aluminium foil, and bake from frozen, adding a few extra minutes to the cooking time to ensure it bakes evenly and thoroughly.
What cheese works best in a spring vegetable tart?
Feta, goat cheese, and mozzarella are excellent choices for a spring vegetable tart. Each offers unique flavour profiles that beautifully complement the vegetables, creating a harmonious blend of tastes that delights the palate.
How long does it take to bake the tart?
Typically, a spring vegetable tart takes about 30-40 minutes to bake at 180°C (or 350°F). Keep an eye on it to achieve a golden crust and perfectly set filling that makes for a delightful meal.
Can I add protein to my tart?
Yes! Incorporating cooked chicken, bacon, or even tofu can add protein to your tart, making it a more substantial meal that satisfies everyone’s hunger while still highlighting the fresh vegetables.
What should I serve with the tart?
Pair your tart with a light salad dressed with vinaigrette, or serve it with a dollop of crème fraîche for added creaminess and balance that enhances the overall dining experience, making it even more enjoyable for your guests.
How do I know when my tart is done baking?
Your tart is done when the filling is set with a slight jiggle in the centre, and the pastry edges are golden brown. A toothpick inserted should come out clean, indicating that your tart is perfectly baked and ready to be enjoyed.
Connect with us on Facebook!
The post How to Cook a Spring Vegetable Tart: A Fresh Guide appeared first on https://cookinggods.com


Comments are closed